We can't find the internet
Attempting to reconnect
Something went wrong!
Hang in there while we get back on track
Blog
Posts by published date2023
TIL: Read from STDIN in Elixir on HackerRank
Grab input data in HackerRank problems
Grab the input provided by HackerRank from STDIN with:
input = IO.read(:stdio, :all)
  |> String.split("\n", trim: true)
If the input provided are numbers you might want to chain the above with:
input = IO.read(:stdio, :all)
  |> String.split("\n", trim: true)
  |> Enum.map(&String.to_integer/1)
In recent versions of Elixir (v1.13.0 or above) you might
want to use IO.read(:stdio, :eof) instead.
But HackerRank is running Elixir 1.8.2 which don’t
support the :eof option yet (LeetCode uses 1.15.7 by
the way…).
You can look at the Elixir version from within the REPL
with: System.version.
Permutations in Elixir
Generate all the permutations of a given list
While working on a problem, suddenly I had the need to get a hold of all the permutations of the elements in a list.
Thus, I did what any good engineer would do: I browsed the internet for a little bit and found a solution.
It makes use of for comprehensions and recursion.
It’s very concise and elegant, judge yourself:
defmodule Util do
  def permutations([]), do: [[]]

  def permutations(list) do
    for(item <- list, rest <- permutations(list -- [item]), do: [item | rest])
  end
endTIL: Compare dates in Elixir
The right way to do date comparison in Elixir
Directly comparing dates with >, <, <=, etc.
won’t throw an error, but can give the wrong result.
The right way to go about it, is to use Date.compare/2.
E.g.:
today = Date.utc_today()
tomorrow = Date.add(today, 1)
yesterday = Date.add(today, -1)

Date.compare(today, tomorrow)
# :lt

Date.compare(today, today)
# :eq

Date.compare(today, yesterday)
# :gtTIL: Escape JavaScript RegExp string
Create a regular expression from any string
Sometimes you try to use certain strings to create regular expressions.
The problem is these string might contain characters that have special meaning inside a RegExp. For example:
const myString = '[Hello?](World)!!!'
To escape it for safe use as a regex pattern, lodash provides
escapeRegExp.
const myString = '[Hello?](World)!!!'
// "\\[Hello\\?\\]\\(World\\)!!!"TIL: Capture keydown events on DIV elements
How to capture keydown/keypress events on HTML elements that aren't inputs
Just set the tabindex attribute, then you’ll be able to listen
to keydown — or keyup, keypress — events like this:
<div tabindex="1" @keydown.esc="doSomething()">
  I can emit keydown events now!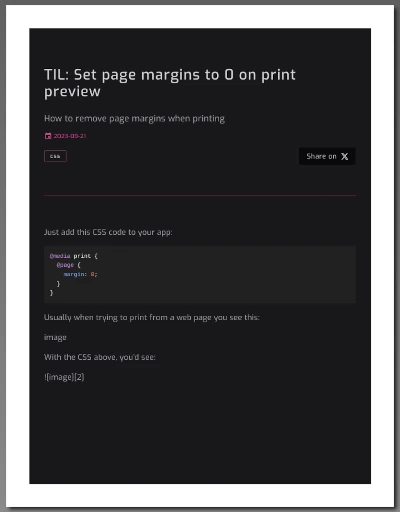
</div>TIL: Set page margins to 0 on print preview
How to remove page margins when printing
Just add this CSS code to your app:
@media print {
  @page {
    margin: 0;
  }
}
Print preview:
|
|
| Default margins | No margins |
Set up Stable Diffusion in Linux
Run Stable Diffusion locally.
These notes serve as a walkthrough for people that —who like me— are not Python developers, but would like to run Stable Diffusion in their own machine.
The goal being to be able to type something like:
python scripts/txt2img.py --prompt "a photograph of an astronaut riding a horse" --plmsAnd get a picture out of that. :)
Set up Jellyfin in Linux
Install your very own home media server.
Currently, the most popular media servers are Plex, Emby, and Jellyfin.
In this tutorial we’ll go with Jellyfin as it is completely open source, doesn’t offer any premium features, nor it needs an external account to function properly.
Installation
Let’s go with the easiest one: Using the available packages.
sudo pacman -S jellyfin-server jellyfin-web2022
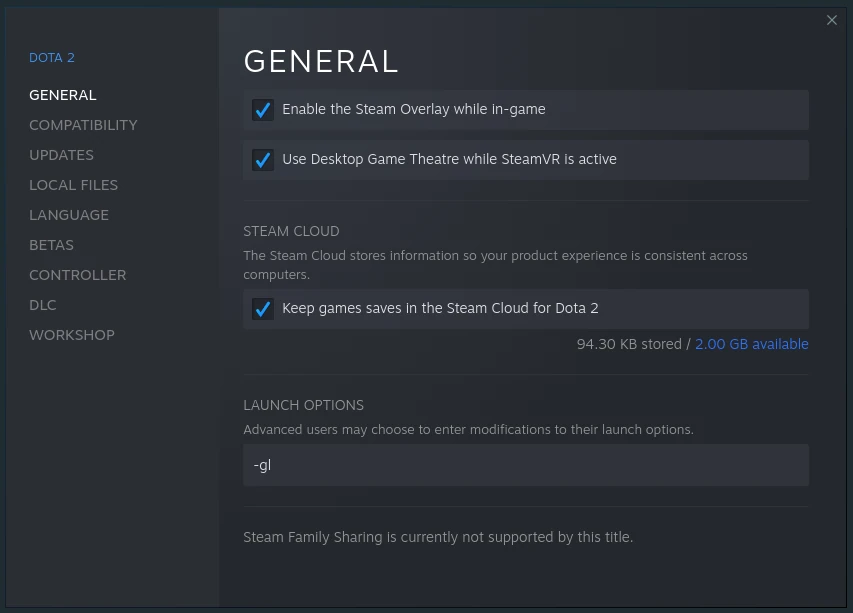
Dota 2: Black screen on Linux
Game keep hanging after launch.
Dota 2 won’t start
One thing that worked for me —which also improved the game
performance— was to switch from Vulkan to OpenGL
by passing -gl to the Launch Options.
TIL: How to reset all stores in Pinia
An easy way to reset all the stores in your app.
I just learned that every Pinia store has a $reset function.
To reset all in-use stores you just need to:
import { getActivePinia } from 'pinia'

const pinia = getActivePinia()

pinia._s.forEach((store) => store.$reset())Import tailwind.config.cjs in Vite
Vite is ESM only, how do we import CommonJS files in it?
Let’s say you have a brand new Vue 3 + Vite project. You add Tailwind CSS to it and now you want to reference the config values inside a component.
Our goal will be to console.log(twConfig) to be able to browse
the values in the console.
Easy enough, there seems to be some documentation for that right there in the official docs: Tailwind CSS - Referencing in JavaScript
There is a problem though. Let’s follow the instructions, add
this to your src/App.vue file:
import resolveConfig from 'tailwindcss/resolveConfig'
import tailwindConfig from '../tailwind.config.cjs'

const twConfig = resolveConfig(tailwindConfig)

console.log('twConfig', twConfig)A confirmation dialog component with Vue 3 and Tailwind CSS
Let's write a reusable confirmation dialog with Vue and Tailwind CSS.
Prerequisites
We’ll use the <BaseModal> component we wrote in:
A basic modal component with Vue 3 and Tailwind CSS.
Desired API
Let’s suppose we already have a <ConfirmationDialog> component,
and we’d like to use it like this:
Dialog 1
<script setup lang="ts">
import { ref } from 'vue'
import ConfirmationDialog from '@/components/modals/ConfirmationDialog.vue'

const showDialog = ref(false)

function handleResult(value: boolean) {
  showDialog.value = false
  // Do something with `value`
  console.log('value', value)
}
</script>

<template>
  <ConfirmationDialog :show="showDialog1" @result="handleResult" />
</template>A basic modal component with Vue 3 and Tailwind CSS
Let's write a reusable modal with Vue and Tailwind CSS.
Let’s go for a simple base modal implementation that provides a
backdrop and a centered <div> where we can put any content
we need.
Example usage in BaseModalExample.vue:
<script setup lang="ts">
import { ref } from 'vue'

import BaseModal from '@/components/modals/BaseModal.vue'

const showModal = ref(false)
</script>

<template>
  <button
    type="button"
    class="bg-indigo-200 px-3 py-1 font-medium"
    @click="showModal = true"
  >
    Show modal
  </button>

  <BaseModal :show="showModal">
    <div class="p-4">
      <div class="text-lg">Hello Modal World!</div>

      <div class="py-2 text-sm">Click to close:</div>

      <button
        type="button"
        class="bg-indigo-200 px-3 py-1 font-medium"
        @click="showModal = false"
      >
        Hide modal
      </button>
    </div>
  </BaseModal>
</template>Vue 3 testing cheat sheet
What are the basic constructs used for testing in Vue?
Lately, I’ve been realizing that co-located tests are better.
It’s easier to see which components are tested or not, or quickly open a component’s tests right there! — as opposed to going to a different folder to crawl a hierarchy of test files.
mount vs shallowMount
mount will render the whole component and all of its child components.
shallowMount will stub all the child component.
I think it’s preferably to use mount and only stub the things that you need.
Stubs
This is how you can stub sub components:
import { mount } from '@vue/test-utils'
import App from './App.vue'

test('mount component', () => {
  expect(App).toBeTruthy()

  const wrapper = mount(App, {
    global: {
      stubs: {
        MiniMap: true
      }
    }
  })

  expect(wrapper.text()).toContain('MiniMap')
  expect(wrapper.html()).toContain('<mini-map-stub')

  expect(wrapper.html()).toMatchSnapshot()
})Vue 3 with TypeScript cheat sheet
How to properly use types when writing Vue components.
Prerequisites
For this, you’ll need a Vue 3 + TypeScript (+ Tailwind CSS) project.
You can set up one following the instructions here:
Build a Vue 3 + TypeScript dev environment with Vite
Basic types, Records
-
If you want a type meaning “any value”, you probably want
unknowninstead. -
If you want a type meaning “any object”, you probably want
Record<string, unknown>instead. -
If you want a type meaning “empty object”, you probably want
Record<string, never>instead.
Adding properties to the window object
Add a src/index.d.ts file with this content:
export {}

declare global {
  interface Window {
    someVariable: string
    otherThing: number
    // any other variables you need here...
  }
}Cycle through array with JavaScript
Easily cycle through array elements with function generators.
Let’s say you have an array and you’d like to cycle through its elements over and over. How would you go about it?
Let’s try with function generators, shall we?
function* cycleThrough(someArray) {
  while (true) yield* someArray
}
You can use it like this:
function* cycleThrough(someArray) {
  while (true) yield* someArray
}

const sortDirection = ['ASC', 'DESC', null]
const gen = cycleThrough(sortDirection)

console.log(gen.next().value) // 'ASC'
console.log(gen.next().value) // 'DESC'
console.log(gen.next().value) // null
console.log(gen.next().value) // 'ASC'TIL: Iterate an arbitrary number of times with forEach in JavaScript
Or generate an arbitrary number of objects with map
To iterate n number of times, just use forEach like this:
const count = 50

[...Array(count)].forEach((_, index) => {
  console.log(`Line: ${index}`)
})

// Line: 0
// Line: 1
// ...
Other times you might want to build an array of n number of objects — usually when creating demo data.
I’ve found that a simple way to do that is:
const count = 50

[...Array(count)].map((_, index) => {
  return {
    id: index,
    value: Math.random() * 100
  }
})

// [ { id: 0, value: 13.144746993948909 },
//   { id: 1, value: 9.09769909468544 },
//   ...
The key here, is the spread operator on the constructed array. ;)
Remove PDF password in Linux
Let's see how turn a password protected file into a normal one.
Using QPDF
QPDF is a command-line program for Linux that converts from one PDF file to another equivalent PDF file while preserving the content of the file. The tool allows you to encrypt and decrypt, web-optimize, and split and merge PDF files.
If you are using Manjaro, QPDF should be already installed. In case it is not, try with:
sudo pacman -S qpdfTo convert a secured file into an open one, use this command:
qpdf --password=mysecretpassword --decrypt the-secured.pdf new-unsecured.pdf2021
Build a Vue 3 + TypeScript dev environment with Vite
Production grade DX for all your web projects.
Introduction
This is an opinionated guide on how to set up a new Vue 3 project with the aforementioned tech stack plus some extras that can really help in the DX (Developer Experience) department.
Stuff like:
- Prettier
- Husky
- ESLint + styleLint + commitlint
- Maybe Tailwind CSS ;)
And more…
Here are a couple of cheat sheets I wrote for Vue 3 + TypeScript:
Prerequisites
- Install Node.js
Let’s get started
Generate a new project:
pnpm create viteThen input:
- Project name
- Pick Vue
- Pick TypeScript
Let’s set up our project with pnpm.
Enter the project directory, then:
pnpm install
pnpm up --latest
2020
Parse Twitter's date format with Elixir
How to parse something like Sun Aug 15 14:15:50 +0000 2021?
Twitter’s API date format
If you are using Twitter’s API you’ve probably come across their particular way of formatting dates on user’s tweets:
created_at: "Sun Aug 15 14:15:50 +0000 2021",Let’s see how we would parse that into something like this:
~U[2021-08-15 14:15:50Z]Timex
Let’s use Timex for parsing.
Add this to you project dependencies:
  # ...
  defp deps do
    [
      {:timex, "~> 3.7"}
# ...Deploy a Phoenix application to a VPS
Short guide on how to deploy a Phoenix app to Linode/DigitalOcean by hand.
Prerequisites
First, we need a Phoenix app.
The application we’ll be deploying is the one from:
Building a JSON API in Elixir with Phoenix.
I’ll show the steps needed to have this app available at:
http://lobotuerto.com:4000
We’ll go with Ubuntu for the OS.
Also, we should have a domain already configured on that machine.
So, when trying something like this, it should respond as expected:
curl -H "Content-Type: application/json" -X POST \
-d '{"email":"asd@asd.com","password":"qwerty"}' \
http://lobotuerto.com:4000/api/users/sign_in \
-c cookies.txt -b cookies.txt -i
OK, SSH into your VPS then follow the steps below.
Deploy a Phoenix application to Gigalixir
Short guide on how to deploy a Phoenix app to Gigalixir.
Prerequisites
First, we need a Phoenix app.
The application we’ll be deploying is the one from:
Building a JSON API in Elixir with Phoenix.
Deploying to Gigalixir’s free tier
This is the easiest way to get your app up and running.
It’s basically a zero config approach and it just works.
Create a new account on Gigalixir’s website.
Then let’s switch to the CLI tool for everything else.
Install the Gigalixir CLI tool:
sudo pip install gigalixir
After the installation is done, log in.
This will get your API key saved to ~/.netrc:
gigalixir login

# Email: your@email.goes.here
# Password:
# Would you like us to save your api key to your ~/.netrc file? [Y/n]: Y
# Logged in as your@email.goes.here.Elixir CI with GitHub Actions
Set up a continuous integration process for your Elixir project.
Prerequisites
Let’s set up a CI —Continuous Integration— process for an
Elixir project using GitHub Actions.
I’ll use the JSON API we built in this tutorial.
It’s critical to have working tests on the project, otherwise what’s the point of setting CI on it, right?
So, make sure to:
- Have a GitHub account, or create one.
- Have a repository holding your project’s code.
- Have tests set up in your project.
CI workflow
Let’s create a new workflow that’ll run our tests
whenever we push code to main or make a pull request.
Dota 2: Game client is out of date issue
Unable to update, even after restarting.
Whenever you see this message you usually close the game client, wait a bit until the update finishes downloading then restart the game.
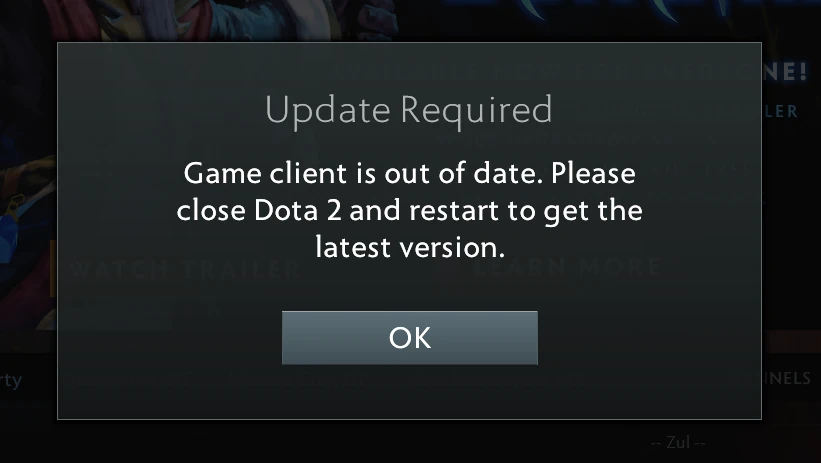
But sometimes, the updating process will never start, and you will be greeted with this dialog all the time with no way of getting rid of it, lest you reinstall the game —which is not practical when the whole game is around ~25GB.
So, what to do?
Datos abiertos de México y COVID-19
Enlaces a datos públicos y casos de COVID-19 en México.
Después de buscar un buen rato, logré recabar un conjunto de enlaces con todo lo necesario para hacer visualización de datos georeferenciada.
Dejo aquí la información para cualquiera que ande buscando.
Datos abiertos del INEGI
Estos datos pueden servir para visualizar la información provista por la Secretaría de Salud sobre un mapa de la república mexicana.
Mapas georeferenciados
Aquí puedes descargar el marco geoestadístico más
reciente que indica que sigue el estándar de datos abiertos:
Ver lista de descargas
La descarga está compuesta de archivos en formato ZIP, uno para cada entidad y uno más para el marco geoestadístico integrado.
Los ZIPs contienen archivos SHP (ESRI Shapefile).
Estos archivos pueden ser importados en un programa como QGIS y ser exportados —por ejemplo— a formato GeoJSON.
Con GeoJSON en mano puedes usar D3 para desplegar el mapa de la república mexicana en un navegador.
Identify a mobile browser with JavaScript
How to tell if someone is using a cell phone to browser your site.
After some research, I have found that the easiest and more reliable way to tell if the current browser is on a mobile device is with this:
Source code
function isMobile () {
  return /Mobi/.test(window.navigator.userAgent)
}
Just as the MDN says on the topic:
In summary, we recommend looking for the string “Mobi” anywhere in the User Agent to detect a mobile device.
Easy peasy, lemon squeezy! :lemon:
Validate a required boolean in Vue
Useful when making sure checkboxes have been ticked
Required booleans
Let’s say you have a checkbox that you need your users to click/check before proceeding —like accepting some ToS or agreeing to something.
This falls on the realm of form validation, and there is nothing better than Vuelidate for that.
If you already know some Vuelidate you might be tempted to go with something like:
<!-- template... -->


<script>
import { required } from 'vuelidate/lib/validators'

export default {
  data () {
    return {
      hasAccepted: false
    }
  },

  validations: {
    hasAccepted: { required }
  }
}
</script>
But you just can’t use the required validator on a checkbox —or switch.
That’s because it’s a boolean.
DOM manipulation with D3 in Vue 3
Showcase the evolution of D3's general update pattern.
Prerequisites
Install the required packages:
pnpm add d3-selection d3-transition
pnpm add -D @types/d3-selection @types/d3-transition
How to import D3
You can import the whole of D3:
// Needs `pnpm add d3`

import * as d3 from 'd3'

// OR...

const d3 = await import('d3')
But the whole of D3 might contain functionality you won’t be using at the moment.
I think it’s better to install and import only the parts you know for sure you’ll use.
How to add Tailwind CSS to Vue.js
My new favorite utility-first CSS framework!
Basic setup
This guide builds on Quickstart guide for a new Vue.js project.
We are going to setup Tailwind CSS + PurgeCSS to get a very lean CSS system that’ll only include what we actually use from Tailwind.
Install dependencies
yarn add tailwindcss
yarn add --dev @fullhuman/postcss-purgecss
Generate Tailwind CSS config file
Create a ready-to-be-extended tailwind.config.js file:
npx tailwind init # --full
If you want a full config file, you can remove the #
and pass the --full flag to the command above.
How to add Vuetify to Vue.js
Material Design for the greater good!
Basic setup
This guide builds on Quickstart guide for a new Vue.js project.
Install Vuetify
Let’s use the new vue add command to install Vuetify:
vue add vuetifyInstall Google Chrome in Linux
Still one of the best dev environments for web apps.
Let’s install Google Chrome from the AUR:
cd ~/tmp
git clone https://aur.archlinux.org/google-chrome.git
cd google-chrome/
makepkg -si
Execute with:
google-chrome-stable &Install VSCode in Linux
The one and only, the fabulous Visual Studio Code in Linux.
One code editor to rule them all…
Visual Studio Code is fast, nimble, and beautiful.
cd ~/tmp
git clone https://aur.archlinux.org/visual-studio-code-bin.git
cd visual-studio-code-bin/
makepkg -si
Execute with:
code &inotify watchers
We need to increase the amount of inotify watchers.
This is needed so Visual Studio Code can manage projects with a lot of files:
echo fs.inotify.max_user_watches=524288 | sudo tee \
/etc/sysctl.d/40-max-user-watches.conf && sudo sysctl --system
2019
Format a USB drive as FAT32 in Linux
This can be useful if you need to flash some BIOS or interact with a Windows machine file system.
Why FAT32
Although in theory no one should be using these file systems anymore, in practice, sometimes you just need one, for example for flashing your motherboard’s BIOS or some other arcane task. Or maybe just for having a drive that’s compatible with Windows.
Whatever the reason, here is a guide on how to achieve this using Linux.
First, correctly identify the drive location
Open a terminal and type:
sudo fdisk -lSet up Manjaro i3
Imagine no longer having to minimize, maximize, resize or rearrange any windows, ever, again.
Thx i3wm. ❤️
If you still don’t know what i3 is, please have a look at this.
Prerequisites
Create a live USB for Manjaro Linux —instructions here.
Then install it.
Offline set up
Things to do before connecting to the network.
Create common directories:
mkdir -p ~/bin ~/encrypted ~/tmp
Make some ~/.bashrc additions:
alias ll="ls -lhF"
alias la="ls -lahF"

export HISTCONTROL=ignoredups:ignorespace
export PATH=~/bin:$PATH

export PS1="\[\e[37;1m\]\t . \[\033[01;32m\][\u@\h\[\033[01;37m\] \W\[\033[01;32m\]]\$\[\033[00m\] "Cómo entrar a la configuración del módem de Telcel
El admin de tu módem está en 192.168.8.1
URL de acceso
Para entrar a la página de configuración, abre tu navegador y visita la siguiente URL:
http://192.168.8.1Datos de acceso
- Nombre de usuario: Telcel
- Contraseña: Telcel
Configura los servidores DNS
Mirando en el admin del módem no encontré por ningún lado la manera de especificar los servidores DNS que quería utilizar. Buscando en internet leí que cuando esas opciones de configuración no están disponibles, usualmente están escondidas.
Aquí les presento cómo llegar a ellas:
-
Entra al admin de tu módem y da clic sobre Configuraciones, después en el menú lateral da clic sobre WLAN y en el submenú clic a DHCP.
-
Estando en esa página abre las DevTools de tu navegador —usualmente con F12— e introduce el siguiente código en la consola:
 a = document.querySelector('#dhcp_primary_dns')
 a.style.display = 'table-row'

 b = document.querySelector('#dhcp_secondary_dns')
 b.style.display = 'table-row'
Ahora verás los campos para Servidor DNS primario y Servidor DNS secundario.
Listo. Configura y da clic en Aplicar.
Enlaces
Add subtitles to a video in Linux
Let's hardcode some .srt/.ass subtitles into a video with ffmpeg.
.srt subtitles
Ever wondered how to hardcode .srt subtitles into a video?
Or how to modify the font size before fusing them?
These notes will show exactly how.
From ISO-8859-1 to UTF-8
For the process to be successful, we need the .srt file to be UTF-8
encoded.
Spanish subtitles files are commonly encoded as ISO-8859-1.
So, is it ISO-8859-1 or UTF-8?
We can find out with:
file some.srtIf it’s UTF-8 encoded, you’ll see something like:
some.srt: UTF-8 Unicode text, with CRLF line terminators2018
Calibre dark mode in Linux
Allow Calibre to use the OS dark mode setting.
Manjaro i3 ships with a dark theme/mode setting by default.
Something I really appreciate.
When you install Calibre and open it, you’ll find that
it doesn’t use the system’s dark mode.
However, telling it to do so is really easy.
You just need to set the CALIBRE_USE_SYSTEM_THEME env var, like this:
echo -e '\nexport CALIBRE_USE_SYSTEM_THEME=1' >> .profile
To try it out immediately, export the CALIBRE_USE_SYSTEM_THEME
var and launch Calibre like this:
export CALIBRE_USE_SYSTEM_THEME=1
calibre&
If you want the setting to work through d-menu (SUPER + D) then
you need to logout and login back.
That’s it! :tada:
How to fix Redshift in Manjaro Linux i3
No more strained eyes at night
Create a Linux live USB
No special apps or some other nonsense required. The CLI already provides everything we need for this task.
Download a Linux ISO image
The XFCE Desktop from Manjaro is a good one.
Download the latest image from here.
If you want to verify the .iso image, you can also download the checksum (.sha512) and signature (.sig) files.
Verify the checksum
Verify the ISO image against the .sha512 file like this:
sha512sum -c manjaro-xfce-22.0-221224-linux61.iso.sha512
If everything is all right, you’ll see:
manjaro-xfce-22.0-221224-linux61.iso: OK.
Basic Git configuration
Let's customize the git configuration for an improved DX.
Set up our user and email:
git config --global user.name "Your name goes here"
git config --global user.email "your@email.goes.here"
Always git pull with rebase:
git config --global pull.rebase true
Let’s have colored output for git status and git diff:
git config --global color.ui "auto"Enable the automatic detection of CPU threads to use when packing repositories:
git config --global pack.threads "0"Build a JSON API with Phoenix
Let's build a JSON API that uses cookies. Sorry, not sorry JWT.
This guide is for the now outdated Phoenix 1.5 version
— lt
Do you have a Rails background?
Are you tired of looking at outdated or incomplete tutorials on how to build a JSON API using Elixir and Phoenix?
Then, read on my friend!
Introduction
I have found there are mainly two types of tutorials one should write:
- Scoped, focused tutorials.
- Full step-by-step tutorials.
With full step-by-step tutorials being used to teach about new tech stacks.
Going from zero to fully working prototype without skipping steps.
With best practices baked-in, and presenting the best libraries available
for a given task.
I enjoy very much tutorials that take this holistic approach.
So, here is mine. :v:
Install Node.js in Linux
asdf is the easiest way to install Node.js in Linux.
GitHub for asdf-nodejs.
Install asdf
Clone and install from the AUR:
cd ~/tmp
git clone https://aur.archlinux.org/asdf-vm.git
cd asdf-vm/
makepkg -si
Add some lines to your .profile and .bashrc files:
echo -e '\nexport PATH="${ASDF_DATA_DIR:-$HOME/.asdf}/shims:$PATH"' >> ~/.profile
echo -e '\n. <(asdf completion bash)' >> ~/.bashrc
Make changes effective immediately with:
source ~/.profile
exec $SHELL
Update asdf
To update to the latest stable version just redo the process above.
Fluid SVGs with Vue 3
Have your SVGs adjust to their parents width.
A fluid SVG is one that can grow as far as its parent
allows it to.
The trick lies in how we define the <svg> element.
Only set the viewBox attribute, but don’t set a
height nor width on it.
Thus, it’ll preserve its aspect ratio, growing and shrinking accordingly.
Install Elixir in Linux
The easiest way to install Elixir in Linux is through asdf, period.
GitHub for asdf-erlang | GitHub for asdf-elixir
Version managers are great. With them you are able to install multiple
versions of the languages you use.
I’ve been using asdf to install Erlang and Elixir
with OTP support for quite some time now.
Install asdf
Clone and install from the AUR:
cd ~/tmp
git clone https://aur.archlinux.org/asdf-vm.git
cd asdf-vm/
makepkg -si
Add some lines to your .profile and .bashrc files:
echo -e '\nexport PATH="${ASDF_DATA_DIR:-$HOME/.asdf}/shims:$PATH"' >> ~/.profile
echo -e '\n. <(asdf completion bash)' >> ~/.bashrc
Make changes effective immediately with:
source ~/.profile
exec $SHELL
Update asdf
To update to the latest stable version just redo the process above.
Install PostgreSQL in Linux
The big elephant in the room, the world's most advanced open source relational database.
Installation process
Setting up PostgreSQL in Manjaro Linux is very easy.
Just follow these steps and you’ll have a working installation in no time.
Install the postgresql package:
sudo pacman -S postgresql postgresql-libs postgis
Switch to the postgres user account and initialize the database cluster:
sudo -i -u postgres
initdb --locale $LANG -E UTF8 -D '/var/lib/postgres/data/'
exit
Options for initdb are as follows:
-
--localeis the one defined in/etc/locale.conf. -
-Eis the default encoding for new databases. -
-Dis the default location for storing the database cluster.
You can have it always running when your machine starts with:
sudo systemctl enable --now postgresql.service
Otherwise, you could start, stop or restart it
when needed with:
sudo systemctl start postgresql.service
sudo systemctl stop postgresql.service
sudo systemctl restart postgresql.serviceSet up full disk encryption in Linux
Let's set up FDE for a secondary HDD that can be used as backup.
Introduction
Let’s say that you get a brand new 2TB/4TB/8TB/xTB HDD, and you want to use it
as a safe backup device.
That means you want to encrypt everything you put in it.
So, assuming you’ve already installed the drive on your computer; let’s prepare it for FDE (Full Disk Encryption).
Correctly identify the drive name
Open a terminal and type:
sudo fdisk -lYou’ll see a list of storage devices connected to your computer and their partitions —if any.
You need to identify the one you just connected. It’s very easy if your devices are of different sizes, since that can easily indicate the drive you want to work with.
You can also use the lsblk command to see a list of all
block devices and their partitions:
lsblkExample output:
NAME  MAJ:MIN RM   SIZE RO TYPE  MOUNTPOINT
sda 8:0 0 1.8T 0 disk2017
Cómo entrar a la configuración del módem de izzi
El admin de tu módem está en 192.168.0.1
URL de acceso
Para entrar a la página de configuración, abre tu navegador y visita la siguiente URL:
http://192.168.0.1Datos de acceso
- Nombre de usuario: admin
- Contraseña: password
Dados esos valores que trae por defecto te recomiendo que cambies el password del admin tan pronto como puedas.
Enlaces
2014
2013
2012
2010
Cómo entrar a la configuración del módem de Telmex
El admin de tu módem está en 192.168.1.254
URL de acceso
Para entrar a la página de configuración, abre tu navegador y visita la siguiente URL:
http://192.168.1.254Datos de acceso
- Nombre de usuario: TELMEX
- Contraseña: (la clave WPA que viene en la etiqueta sobre el aparato)