2018 . 11 . 22 update
I lost my MacBook Pro, so I won't be able to test, and thus update these notes anymore. 😦
Introduction
I have laid my eyes on a new distribution that bakes in i3 with it: Manjaro Linux i3 Community Edition.
What I can say is that Manjaro Linux feels nimble and agile in my hands, meanwhile Ubuntu has started to feel bloated and sluggish.
So, what follows is a very opinionated guide for installing Manjaro Linux on a MacBook Pro from Mid 2014, and leave it in a perfect state for desktop and software development usage ---kind of what I had before with Ubuntu.
Still on the quest for the perfect OS.
Let's start!
Download
Preparing the live USB
You need another Linux machine, or a way to make a Manjaro Linux live USB stick.
Once you have downloaded the .iso image you can follow these instructions to prepare the USB drive.
Booting from USB
Turn off your machine, insert the USB drive, then turn it on, and as you hear the distinctive sound when it starts,
press and hold the alt key until a boot menu appears. Select the one that says EFI.
You'll be presented with a preconfiguration screen. Select your timezone, keyboard distribution, language, free drivers, then: Boot: manjaro.x86...
Installation
You'll be presented with a dialog with many buttons, click on the one that says: Launch installer.
You might see a couple of warnings, they usually are about:
- The machine is not connected to a power source.
- The machine is not connected to the Internet.
When you get to Partitions select Erase disk to get rid of everything on that Mac. Don't worry you'll always be able to recover OSX if you really want to ---but not your data though, so be careful!
While still there, you can enable FDE (Full Disk Encryption) by clicking on the Encrypt system checkbox and picking a nice and long passphrase for it.
Then just click through the install wizard and wait for it to finish the installation process.
Configuration
Fix your High-DPI screen
The first thing to do is to improve our ability to read that super small text on the terminal.
Check the supported modes ---AKA resolutions--- for your screen with:
xrandr
If the initial DPI is too much for you ---as it is for me--- try a couple of other resolutions and see what you
feel comfortable with. In my case I usually settle with 1680x1050 or 1400x900.
Try them out like this:
xrandr --output eDP1 --mode 1400x900
To make this permanent, edit ~/.i3/config and add this line at the end:
exec --no-startup-id xrandr --output eDP1 --mode 1400x900
Network
Setup your DNSs to Google Public DNS :
- IPV4:
8.8.8.8, 8.8.4.4. - IPV6:
2001:4860:4860::8888, 2001:4860:4860::8844.
i3 config file
If you don't want to have an i3 binding that opens a PDF help file, then comment out
this line in ~/.i3/config:
# bindsym $mod+Shift+h exec xdg-open /usr/share/doc/manjaro/i3_help.pdf
I think these are better values for gaps:
gaps inner 2
gaps outer 0
You can modify the auto-lock time on this line ---it's expressed in minutes:
exec --no-startup-id xautolock -time 10 -locker blurlock
I usually change that to 30 or 60 minutes.
UFW
Activate the firewall service at boot with:
sudo ufw enable
sudo systemctl enable --now ufw.service
Browsers
At this point you probably want to get into a browser to read / follow some configuration guides.
This distro comes with the Pale Moon browser. I tried it out, didn't like it.
To get rid of it:
sudo pacman -Rns palemoon-bin
Now, to install anything, first we need to generate a ranked mirror list then update the package databases:
sudo pacman-mirrors --geoip
sudo pacman -Syy
If you want to tweak the ranked mirror list, you can find it here: /etc/pacman.d/mirrorlist.
If you feel the --geoip option takes too much time, you can get a list of the available countries it checks on with:
pacman-mirrors -l
Let's say you are interested in mirrors from United_States and Canada only:
sudo pacman-mirrors -c United_States,Canada
To upgrade your installed packages:
sudo pacman -Su
Now, to install the big two ---Firefox and Google Chrome:
sudo pacman -S firefox namcap
yaourt -S google-chrome
.bashrc
In a terminal:
# convenient ll list command
echo -e '\nalias ll="ls -lhF"' >> ~/.bashrc
# convenient la list command
# same as before, but show hidden files
echo -e '\nalias la="ls -lahF"' >> ~/.bashrc

# Let calibre know it should use the system theme (usually dark)
echo -e '\nexport CALIBRE_USE_SYSTEM_THEME=1' >> ~/.bashrc
Keyboard
Second on the list of annoyances is the keyboard, since I like to move fast on my i3 desktop environment, swapped out keys don't help, let's fix that.
Swap Alt and Cmd keys
Let's swap the Alt and Cmd keys out.
With immediate effect:
echo 1 | sudo tee /sys/module/hid_apple/parameters/swap_opt_cmd
To make it permanent:
echo options hid_apple swap_opt_cmd=1 | \
sudo tee -a /etc/modprobe.d/hid_apple.conf
Swap Multimedia keys and Function keys
Let's enable function keys (f1, f2, f3...) by default ---instead of default multimedia keys.
With immediate effect:
echo 2 | sudo tee /sys/module/hid_apple/parameters/fnmode
To make it permanent:
echo options hid_apple fnmode=2 | \
sudo tee -a /etc/modprobe.d/hid_apple.conf
GRUB
I usually remove the quiet option from grub in /etc/default/grub.
I like my startup process noisy.
If you edit the grub file, don't forget to:
sudo update-grub
Change Linux kernel version
Do you want to try out the 4.17.9-1 kernel version?
Then, execute:
manjaro-settings-manager
Click on Kernel, then click Install on the version you want to try out.
Restart.
Trim SSD storage
If you have an SSD and you didn't enable FDE (Full Disk Encryption) when installing, you can activate a periodic TRIM operation that'll run by default on a weekly basis with:
sudo systemctl enable --now fstrim.timer
It's based on the timestamp of: /var/lib/systemd/timers/stamp-fstrim.timer.
dm-crypt + TRIM
Before enabling TRIM on a drive, you should make sure you SSD supports it, otherwise data loss can occur. Check this out: Solid State Drives#TRIM
To check if your drive supports it:
sudo hdparm -I /dev/sda | grep TRIM
You should see something like:
* Data Set Management TRIM supported (limit 8 blocks)
You can also check with:
lsblk --discard
And see if the DISC-GRAN and DISC-MAX are not 0B.
So, if you have read the security implications of activating TRIM for encrypted devices and still want to do it, this is how you do it:
sudo nano /etc/default/grub
Add the :allow-discards like this: cryptdevice=UUID=SOME-ID:luks-SOME-ID:allow-discards root=/dev...
So you end up with a line that looks like this:
GRUB_CMDLINE_LINUX_DEFAULT="cryptdevice=UUID=SOME-ID:luks-SOME-ID:allow-discards root=/dev/mapper/luks-SOME-ID resume=/dev/mapper/luks-SOME-ID"
After changing the /etc/default/grub file, run:
sudo update-grub
Restart, and now you can try the sudo fstrim / -v command, and should see an output like:
/: 439.1 GiB (471479136256 bytes) trimmed
If everything works well, don't forget to activate the weekly service with:
sudo systemctl enable --now fstrim.timer
If you want to see the service status:
sudo systemctl status fstrim.service
To run the service immediately:
sudo systemctl start fstrim
Generate a new SSH key
If you don't have an SSH key in ~/.ssh, you can create one with:
ssh-keygen -t rsa -b 4096 -o -C "user@some-place"
SSH service
If you want to allow incoming SSH connections through the firewall, try with this:
sudo ufw allow SSH
Enable the SSH service:
sudo systemctl enable --now sshd.service
You can now ssh-copy-id a key from another machine.
After that initial setup, harden your security by uncommenting and modifying the following lines
in /etc/ssh/sshd_config:
PermitRootLogin no
PasswordAuthentication no
If you ever modify the /etc/ssh/sshd_config file, restart the SSH service with:
sudo systemctl restart sshd.service
WiFi
I solved this by first connecting through an USB-Ethernet adapter cable ---this one has worked great so far.
Find out which kernel version you have installed with uname -a.
Then let's install the appropriate headers and driver:
sudo pacman -S linux-headers broadcom-wl-dkms
In my case, I selected the linux414-headers.
Let's restart to try out our configs so far!
You should be able to use WiFi now.
If you don't, and you see something like this in your journalctl -b logs:
kernel: wl: version magic '4.14.15-1-MANJARO SMP preempt mod_unload modversions retpoline ' should be '4.14.15-1-MANJARO SMP preempt mod_unload modversions '
You might be able to force WiFi activation with this:
sudo modprobe wl --force-vermagic
It worked just fine over here.
Sound
This came as a surprise, sound is not working out of the box.
The good news is: It only requires some tweaking and it'll be good to go.
Edit this file:
sudo nano /etc/modprobe.d/alsa-base.conf
And put inside:
options snd_hda_intel enable=1 index=0
options snd_hda_intel enable=1 index=1
Install pulseaudio and pavucontrol:
sudo pacman -S pulseaudio pavucontrol
Also, the mute key works OK for muting, but pressing it again won't un-mute your sound card.
To fix it, add this at the end of your ~/.i3/config:
bindsym XF86AudioMute exec --no-startup-id amixer -D pulse sset Master toggle
This one requires a system restart.
After rebooting, you should have sound coming out from your computer, and a working set of multimedia keys.
Day-to-day activities
Copy & paste
You can paste stuff using a 3-finger touch/click on the trackpad.
Or, since the default terminal is Urxvt, you can copy with Ctrl+Shift+C and paste with Ctrl+Shift+V.
Change desktop appearance
Maybe you don't like the dark theme stuff from the default installation. No problem.
Try with this:
lxappearance
Desktop software
If you miss the cozy space of a file manager, you can get a good one with Thunar .
sudo pacman -S inkscape libreoffice-fresh gnote calibre openshot \
thunar clementine simple-scan redshift python-gobject python-xdg \
youtube-dl feh cups unzip colordiff
To execute redshift on init, edit ~/.i3/config and add this line at the end:
exec --no-startup-id redshift
Don't know what redshift is? Have a look here.
Printing
To enable CUPS and access to http://localhost:631:
sudo systemctl enable --now org.cups.cupsd.service
Network service discovery
This is useful if you have a network printer:
sudo systemctl enable --now avahi-daemon.service
Now CUPS should detect it without problems.
Go to this URL http://localhost:631, and add your network printer over there!
Software development
Here are some links to tools I use on a daily basis to write software:
Increase the amount of inotify watchers
This is needed so Visual Studio Code can manage projects with a lot of files:
echo fs.inotify.max_user_watches=524288 | sudo tee /etc/sysctl.d/40-max-user-watches.conf && sudo sysctl --system
Setup z
Now that we have Git installed, let's intall z to easily navigate
directories on the CLI:
git clone https://github.com/rupa/z ~/z
echo ". ~/z/z.sh" >> ~/.bashrc
exec $SHELL
Usage
After cding into various directories, for example:
cd ~/development/web/project1
cd ~/development/mobile/client33
You can now cd into those directories from anywhere on the CLI with:
z project1
z client33
You can use TAB for autocompletion too!
Code editor
One code editor to rule them all...
Visual Studio Code is fast, nimble, agile and beautiful.
yaourt -S visual-studio-code-bin
Visual Studio Code extensions
This is the list of extensions that I use the most:
- ElixirLS: Elixir language support.
- gettext: Gettext files support.
- GitLens: Amazing Git support inside your editor.
- language-stylus: Stylus syntax highlighting.
- markdownlint: Markdown language support.
- Sass: Sass syntax highlighting.
- Vetur: Vue.js files support.
- vscode-icons: File icon theme.
Color themes:
- Dracula Official: Color theme.
- Monokai Pro: Color theme.
- Night Owl: Color theme.
- Palenight Theme: Color theme.
settings.json
You can open your settings with CTRL + ,:
{
  "editor.detectIndentation": false,
  "editor.insertSpaces": true,
  "editor.formatOnSave": false,
  "editor.tabSize": 2,
  "editor.renderWhitespace": "boundary",
  "files.autoSave": "onFocusChange",
  "files.insertFinalNewline": true,
  "files.trimFinalNewlines": true,
  "gitlens.defaultDateStyle": "absolute",
  "markdownlint.config": {
    "MD012": false, // MD012 no-multiple-blanks - Multiple consecutive blank lines
    "MD025": false, // MD025 single-h1 - Multiple top level headers in the same document
    "MD033": false // MD033 no-inline-html - Inline HTML
  },
  "window.titleBarStyle": "custom",
  "window.zoomLevel": 0.5,
  "workbench.colorCustomizations": {
    "editorCursor.foreground": "#ff00ff",
    "editorWhitespace.foreground": "#ff00ff"
  },
  "workbench.colorTheme": "Monokai Pro",
  "workbench.iconTheme": "vscode-icons"
}
Developer utils
Miscellaneous stuff I require in my day-to-day developer activities...
sudo pacman -S hugo inotify-tools wxgtk ansible
HTML to PDF
Somehow wkhtmltopdf has failed to install on latest Manjaro versions. But I have found a perfect
---and way better--- substitute: Headless Chrome!
You can save an HTML page as a PDF with the following command:
google-chrome-stable --headless --disable-gpu --print-to-pdf=some-pdf-name.pdf http://some.page/url
Git diff colors
Default terminal colors for Git diffs sucks:
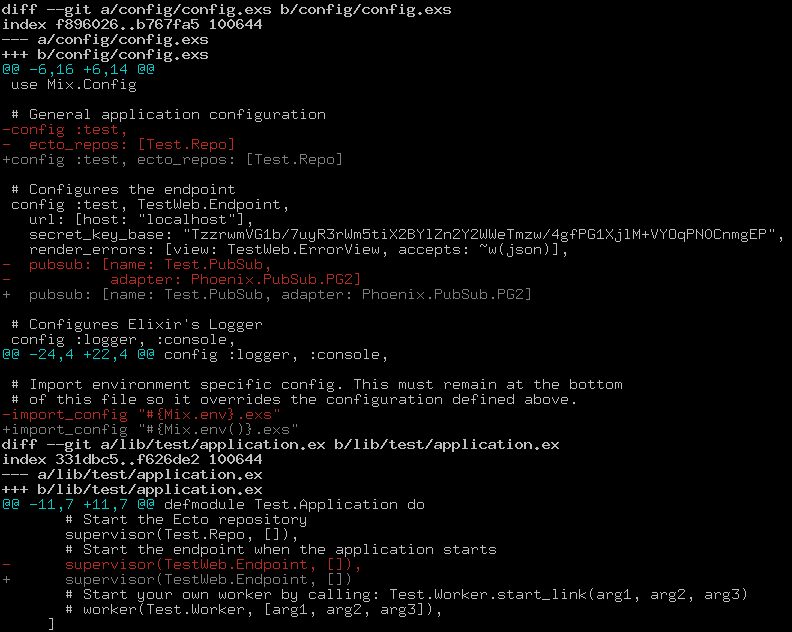
To fix them, and upgrade Urxvt's default behavior add these lines at the end of
your ~/.Xresources file:
! CUSTOM STUFF

! do not scroll with output
URxvt*scrollTtyOutput: false

! scroll in relation to buffer (with mouse scroll or Shift+Page Up)
URxvt*scrollWithBuffer: true

! scroll back to the bottom on keypress
URxvt*scrollTtyKeypress: true

! scrollback buffer in secondary screen
URxvt.secondaryScreen: true
URxvt.secondaryScroll: false

! magenta cursor color
URxvt.cursorColor: magenta

! load solarized dark theme
#include "Xresources.dark"

! working home end keys
URxvt.keysym.Home: \033[1~
URxvt.keysym.End: \033[4~
URxvt.keysym.KP_Home: \033[1~
URxvt.keysym.KP_End:  \033[4~
Now, download Xresources.dark from here and put it in your $HOME directory.
Then modify these lines in it:
!! black dark/light
*color0:                S_base02
*color8:                magenta !!S_base03 => this is commented out!
To make changes effective:
xrdb ~/.Xresources
Finally, close your current terminal and open a new one.
Now your Git diffs will look like this:
Much better! If you ask me... 😉
Daily workflow ready?
Definitely yes!
Chromecast & Videostream
This are the rules you'll need if you have a Chromecast and want to try to cast a video from your laptop:
For a specific IP
sudo ufw allow from 192.168.0.66 to any port 5556
sudo ufw allow from 192.168.0.66 to any port 5558
For any IP in the subnet 192.168.1.x
sudo ufw allow from 192.168.1.0/24 to any port 5556
sudo ufw allow from 192.168.1.0/24 to any port 5558
Here are other examples of how these rules apply:
192.168.1.0/24 => 192.168.1.x
192.168.0.0/16 => 192.168.x.x